Category Archives: IT

Contains Everything IT Related

Detecting mobile browser in ASP.Net

Detecting mobile browsers can be a bit of pain.  Whilst it is relatively easy to get browser information through the User Agent string, it is not such a simple task to identify the client device type.  There is no defined property within the user agent field that says I’m a mobile device.  User Agent values differ widely between devices and browsers, so it is necessary to use some less than elegant detection code.

I recently added this detection functionality to the Camino CMS Framework, and Calzada’s preferred method is using regular expressions.  After some playing, we came up with the following regex:

(?i)(android(?:.+mobile)|applewebkit.+(?:\(KHTML, like Gecko){1}|avantgo|blackberry|blazer|docomo|elaine|fennec|htc|kindle|lge|linux.+armv|mmp|mms(?:.+midp){1}|mobile|mot(?:.+midp){1}|nintendo.+(?:3ds|wii)|nokia|nook|opera(?:.+mini|.+mobi){1}|palm|polaris|phone|ppc|psp|samsung|sec|sony|symbian|tablet|up\.browser|vodafone|wap|webos|windows(?:.+ce|.+mobile){1}|xda|xiino

A simplified ASP.Net detection code would look something like this:

Function IsMobileBrowser() As Boolean
Dim regex As New Text.RegularExpressions.Regex("(?i)(android(?:.+mobile)|applewebkit.+(?:\(KHTML, like Gecko){1}|" & _
"avantgo|blackberry|blazer|docomo|elaine|fennec|htc|kindle|lge|linux.+armv|mmp|mms(?:.+midp){1}|mobile|mot(?:.+midp){1}|" & _
"nintendo.+(?:3ds|wii)|nokia|nook|opera(?:.+mini|.+mobi){1}|palm|polaris|phone|ppc|psp|samsung|sec|sony|symbian|tablet|" & _
"up\.browser|vodafone|wap|webos|windows(?:.+ce|.+mobile){1}|xda|xiino", Text.RegularExpressions.RegexOptions.IgnoreCase)
Return regex.IsMatch(HttpContext.Current.Request.ServerVariables("http_user_agent").ToString)
End Function

There are a couple of key points to bear in mind with this method:

  1. It is not perfect.  No matter how you tailor and tweak the regular expression, you are inevitably going to get some false positives and false negatives.
  2. This is not a write and forget function.  As the number of mobile devices and manufacturers proliferate, the accuracy of the regular expression will diminish.  To compensate, it is necessary to regularly review, test and update where required.  To ensure that this is done, this process has been added this to the Camino development lifecycle.
  3. Not all mobiles or mobile users may wish to use mobile variant of a website.  Do bear in mind that some tablets have a sufficiently large screen to view the normal version of a website.
I am aware that this is not an elegant nor wholly accurate solution, and there are plenty of programmers out there that will view it as a kludge, but in many ways it is a product of its’ ingredients.  Until such time when all browsers will provide a property that simply states I’m running on a mobile device, then this will have to do.

Starting off with WebsitePanel

There are a whole gamut of hosting control panels available.  I have used quite a few of them, and to be fair, none have really satisfied the criteria of being easy to use, powerful and responsive.  The only one that I have vaguely liked to date is Helm 3.  The less that said about Helm 4, the better.

Now, I will accept that I am being a little unfair with the last criteria.  A substantial proportion of a control panel’s response time is taken up by calls on other services, often based on separate hardware.  When you take this into consideration, Hosting Control Panels (HCPs) do succeed in corralling together and presenting management capabilities for multiple services (often from differing providers) in a single interface.  What very few have done is present an interface that is easy to use both from an administrative and end-user perspective.

And this is the critical point.  HCPs are primarily for use by end-users, not administrators, but this is something that is still regrettably not addressed by developers.  End-users often have a poor level of technical literacy, and very few are prepared to wade through tiered menu levels following obscure technobabble.  They just want to create an e-mail account.  Why can’t they just log in and get presented with an Add E-mail Account link?

At Calzada, we are determined to make life simpler for our hosting customers, and admittedly, ourselves.  A good HCP will not only make life easier for our customers, but potentially reduce the number of control panel related support queries.  Therefore, the choice of hosting control panel was critical.  I also have to admit that price is also a controlling factor.  We are a small company, and cannot realistically justify some of the prices being charged for the likes of Plesk and cPanel/WHM.

Unlike in *nix world, open source Windows HCPs are a rarity.  The only real choices are zPanel or WebsitePanel.  After some testing, we opted for the latter as WebsitePanel supported a wider variety of applications than zPanel, and did appear to be more mature.

WebsitePanel is not perfect and there is undoubtedly room for improvement in some areas.  We have experienced a number of glitches that have required workarounds – more posts to come on these – but the overall experience has been fairly good.  The installation program worked like a dream and was noticeably quicker than some of its’ commercial competitors.  I have to admit to warming to WebsitePanel; it does what it is expected to do and it is fairly easy to use for both administrative and end-user purposes.


MySQL Powershell Backup Script

This is easily one of my most commonly used Powershell scripts, and a variation on it runs on my servers at least once a day.  It is essentially a very simple script: it contacts a specified MySQL server and then generates a .SQL backup files for each database found.  It prefixes each backup filename with the day name (monday, tuesday etc.) so if you run it on daily basis, it gives you a seven day backup rotation for your databases.

As always, the use of this script and the accompanying files is done entirely at your own risk. No guarantee either direct or indirect is implied regarding the security, stability, reliability, impact or performance of this script.

The zip file includes copies of mysqldump.exe and mysql.data.dll that you may require.  For details on how to configure and use the script, please see below.

Download the script (ZIP file)

Configuration

There are a few items you will need to configure before you can use the script in anger.  All of the configuration options are presented at the top of the script, so you don’t need to delve into the main chunk of code.

Backup Store Folder

This is where the MySQL backup files will be placed.  Please enter the path here, but do not include any trailing ‘\’

MySQL User Account

You will require a MySQL user account that has SHOW DATABASES, SELECT, LOCK TABLES and RELOAD permissions.  It is also highly advised – especially if performing backups from a remote machine – that this user’s permissions are also limit to readonly.

mysqldump Path

mysqldump is the application that actually creates the backup file.  It is typically installed with MySQL, but if you are running the script remotely or don’t know the file’s location, mysqldump.exe is included in the ZIP file.

MySQL .Net Connector

The script requires the MySQL .Net Connector driver.  This can either be installed, or you can directly load the DLL file.

Using the connector

  1. Download and install the connector from http://dev.mysql.com/downloads/connector/net/
  2. Uncomment Line 38 of the script.  This should say system.reflection.assembly]::LoadWithPartialName(“MySql.Data”)
Loading the library directly (the default method)
If you don’t wish to install the .Net driver, you can directly load the DLL file instead.  The required DLL file is included as part of the ZIP file.
  1. Uncomment line 43 of the script.  This should say Add-Type -Path “C:\Data\Backups\MySQL\MySql.Data.dll”
  2. Amend the path of line 43 to point to the location of the DLL file

Running the script

You can either run the script manually (through Powershell), or automate it through Task Scheduler.  To make life a little easier I tend to create a batch file containing the Powershell command and then invoke the batch file through the task scheduler.

The general format of the command to include in the batch file is

%windir%\System32\WindowsPowerShell\v1.0\powershell.exe “c:\backups\Generic7DayBackup.ps1”

Lastly…

This is by design a very simple script.  If you have any suggestions on how to improve it, please let me know by posting a comment.


Configuring RAID1 on LG N2A2 NAS

I recently purchased an LG N2A2 2 Bay NAS to use as my primary disk to disk backup solution.  As per LG’s recommendation – a big shiny sticker on the box – I upgraded the firmware to the latest version before using the NAS in anger.  This new firmware (6674) has a far improved interface and capabilities than than provided with the firmware shipped with the NAS.  The downside is that all of the online help documentation is in Korean.

As my knowledge of Korean is non-existent, working out how to configure the NAS’ disks to RAID1  required more than a little help from Google Translator.  Detailed below is how I configured RAID1.  As usual, this information is provided “AS IS” and you use it at entirely your own risk.

Caution: ensure you backup all data on the NAS prior to performing this task.  This process will irretrievably wipe all existing data you may have stored on the NAS.

1. Log into the web management interface of the NAS using the admin username and password (by default this is ‘admin’ and ‘admin’).

2. On the homepage of the web interface, click on the Volume option.  If it is not present, go to the Configuration section via the links on the left of the page to find it.

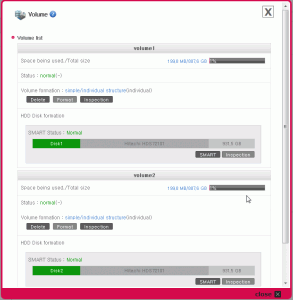
3. If your NAS volumes have never been altered from their as shipped state, the volumes list should contain two separate volume (see screenshot 1).

NAS RAID Screenshot 1

Screenshot 1

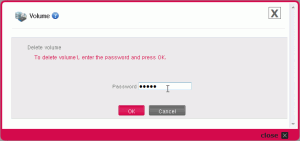
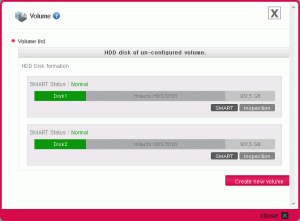
To configure RAID1, both of these volumes must be deleted.  Click on the Delete button next to each volume to do this.  You will be prompted to confirm the deletion (see screenshot 2).  Enter the admin password and click on *OK* to confirm the volume deletion.  Once deleted, a confirmation message will appear (see screenshot 3).

Screenshot 2

Screenshot 2


Screenshot 3

Screenshot 3

4. Once both volumes have been deleted, the volumes list just show the two unused disks (see screenshot 4).  To start creating the RAID1 volume, click on the Create New Volume button.

Screenshot 4

Screenshot 4

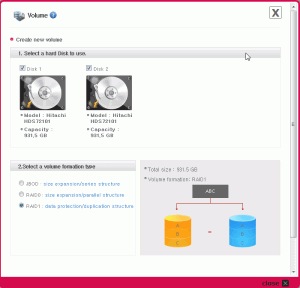
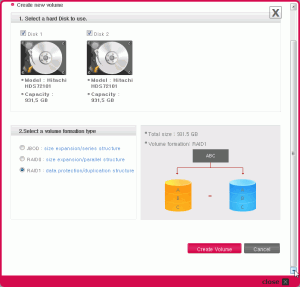
5. The next dialog will list the available unused disks.  Click/select both Disk 1 and Disk 2.  By default, the option RAID1: data protection/duplication structure should automatically be selected under 2. Select a volume formation type, if not, select it (see screenshot 5).

Screenshot 5

Screenshot 5

6. The create new volume dialog is actually larger than its’ containing window.  To proceed, scroll down using the scroll bar on the right and click on the Create Volume button to start the RAID1 creation process (see screenshot 6).

Screenshot 6

Screenshot 6

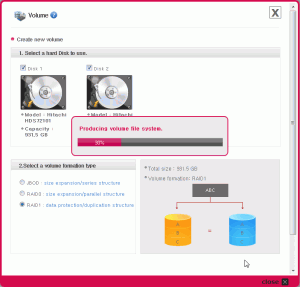
7. The creation process will now begin.  A small dialog will appear showing the progess of the volume creation (see screenshot 7).  Once completed, this dialog will update to display an OK button.  Click on this button to continue.

Screenshot 7

Screenshot 7

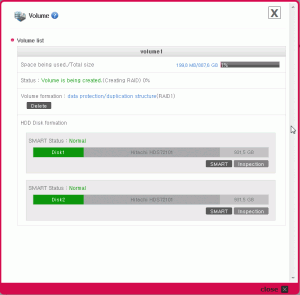
8. You will not be returned to the volume listings which will show a single volume comprising of two disks in RAID1 formation (see screenshot 8).

NAS Screenshot 8

Screenshot 8

Important: The volume is not yet ready for use.

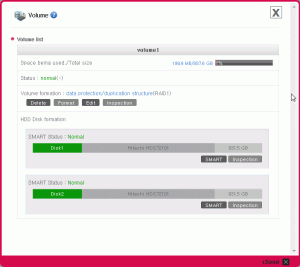
Please note the status message of Volume is being created. (Creating Raid) 0% in screenshot 8.  The new volume is still being configured for RAID.  Only start writing data once this status value changes to normal  (see screenshot 9).  This process may take several hours, and the status message does not dynamically update.  You will need to close the Volume window and then re-open it to get an up-to-date status message.

NAS RAID Screenshot 9

Screenshot 9


Getting HDMI sound working on an ASUS ATI/AMD 4350

When I built my HTPC earlier this year, I replaced the elderly graphics card within the old chassis I was using with an ASUS 4350.  I don’t pretend to be anywhere near an expert on graphics cards, but the limited research I did led me to believe that this card would be ideal.  Relatively cheap, passively cooled and delivered full HD via HDMI.

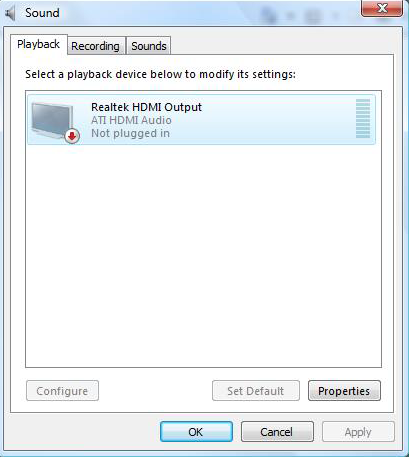
What I did not know then, but what I discovered following installation, is that this card does not output sound via HDMI without some driver jiggery-pokery.  You would see a message similar to this one in the Sound properties dialog within Windows.

In short, neither the supplier driver nor the updated Catalyst drivers from AMD/ATI include the relevant Realtek audio driver.  The solution is relatively simple: you download and install the latest HDMI audio driver from Realtek.

This is what I did earlier this year and my HTPC worked without a hitch until I mistakenly updated the AMD/ATI Catalyst drivers through Microsoft Update which promptly broke it.  Needless to say, I hadn’t written down how to get this working so I had to find out all over again from scratch.

Disclaimer: It is not generally recommended to download and install drivers directly from OEMs.  Your first port of call should be the company that manufacturered the product you are using (in this case ASUS).  If you follow these steps, you are doing so entirely at your own risk.

  1. (Optional) Head over to AMD and grab the latest Catalyst drivers for the card (http://support.amd.com/us/psearch/Pages/psearch.aspx?type=2.4.1&product=2.4.1.3.38&contentType=GPU+Download+Detail)
  2. Go to Realtek’ High Definition downloads site (http://www.realtek.com.tw/downloads/downloadsCheck.aspx?Langid=1&PNid=14&PFid=24&Level=4&Conn=3&DownTypeID=3&GetDown=false).
  3. Check/tick the option Iaccept to the above and then click on the Next button.
  4. Scroll down the list ofWindows drivers until you find the entry ATI HDMI Audio Device (it will be in red text).  Click on one of the three download links to the right to download the driver.
    • There are a couple of possible gotchas when downloading
      1. Last time I tried, none of the US download locations worked.  The links just redirected back to step 2 above
      2. The downloads are FTP transactions that can take upto several minutes to stat.  So don’t worry if nothing happens immediately.
  5. Once downloaded, install the driver.  You should be prompted to restart your computer once completed, if not, do so anyway.
  6. Upon restart, sound may still appear to be disabled.  The trick here  is to pull out the HDMI connection and then replace it.  Once this is done, the HDMI sound connection should be detected and work.


The moral of this particular story:  Sometimes, it is necessary to document things you do with your home systems.


Resetting Webmin password for Ubuntu

The inevitable happened: I forgot the password for Webmin on one of my Ubuntu servers.  In my defence, it is a server that I principally manage via SSH.  Being Ubuntu, the necessary files are not in the same place as Webmin documentation.  However, a quick Google search found a blog post with the solution.  For my own records, I am duplicating below:

  1. Open a shell or SSH session on the target server
  2. Enter the command
    • /usr/share/webmin/changepass.pl /etc/webmin username password
    • Where username = webmin username.  For me this was root
    • And password = new password.
  3. Login to Webmin to test

Thanks to and original information from http://ranawd.wordpress.com/2010/06/14/reset-webmin-password-for-ubuntu/

Given the number of password I seemingly have to remember, I think it is time that I employed some for of Password Safe.

Reset Webmin Password for ubuntu

13 Votes

I found this problem at the first time when webmin installed. Also this happens to everyone at one time or another. You go on vacation and when you come back, you forget all of the passwords on your computer.

I failed logging in several times and then Webmin blocked my IP. Getting localhost blocked isn’t a good thing to see. So I searched the Internet for a way to reset the password and I found this procedure:

1. Login to your computer as root. Type on browser address bar https://localhost:10000/
2. If you are running a Debian distribution (ubuntu), enter the following command:
/usr/share/webmin/changepass.pl /etc/webmin username password
3. Login to Webmin with your reset password.
4. eNjoY!

Remotely managing disks on Windows 2008/Hyper-V Server R2

As I’m mooting some hardware upgrades to my bash’n’crash Hyper-V server, I wanted to check out a few things with regards to it’s performance and general health.  I duly fired up Server Manager, but was thwarted when I tried to use Disk Management and got the message of RPC Server is unavailable.  I checked the Firewall, and the requisite rules (see below) were enabled.  I recycled the Virtual Disk Service and still had no luck.

After hunting around a while I found a Technet Forum post that covered this.  You have to enable the necessary inbound rules both on the server being managed and the managing computer.  Once I had done this, and restarted Server Manager, I could access Disk Management.

For reference, the two rules that need to be enabled are:

Remote Volume Management – Virtual Disk Service (RPC)

Remote Volume Management – Virtual Disk Service Loader (RPC)

As per the Technet post, I found that you don’t need the Remote Volume Management (RPC-EPMAP) rule enabled.  Needless to say, I only enabled both rules for the Domain firewall profile.

Automatically Loading PSHyperV Library

Late last year I wrote about getting the Powershell Management Library for Hyper-V (PSHyper-V) up and running on my Hyper-V installation. Although a newer version of the library was released in January, I simply hadn’t gotten around to updating my server.  If I’m honest, beyond the occasional restart following an update (or powercuts – thanks for nothing EDF Energy) all of the Hyper-V servers under my care tend to sit the corner and are generally forgotten about.  Far more attention is paid to the Virtual Machines than the actual host upon which they rely.

One change between the versions of PSHyperV has been the change from a standard script to a powershell module.  As I prefer for the library to be automatically loaded, this required a change to the user’s powershell profile.  The slight fly in the ointment is that I had forgotten how to do this, so here is a quick reprise for my own memory.

1.  Open Powershell.  If you are within a command prompt, type cmd /c start powershell to open a new powershell window.

2.  In Powershell, type $profile.  This will get you the full path to where your profile is stored.  Your profile is a powershell script that executes whenever a Powershell prompt is opened.  The profile will look something liek this:

C:\Users\<your username>\Documents\WindowsPowerShell\Microsoft.PowerShell_profile.ps1

3.  Your profile file may or may not exist.  If you have not already used it elsewhere, the chances are that it doesn’t.  To create a new profile file, enter new-item $profile -itemtype file -force in Powershell.

4.  Now open the profile file.  If you are using Server Core or Hyper Server R2, you can still use Notepad (it is present, but missing a few features).  So enter notepad $profile in Powershell.

5.  Within Notepad, enter the Import-Module command for PSHyperV.  If you install PSHyperV using the supplied install.cmd, this path should be like

Import-Module “c:\Program Files\modules\hyperv\hyperv.psd1”

6.  Once done, save the file and exit Notepad.

7.  To test, open a new Powershell prompt and type Get-VM.  If everything has gone as planned, you will get a list of all of the VMs present on your Hyper-V server.

This process will only work for the current logged on user.  If you have multiple user accounts on Hyper-V, you will need to repeat this process for all that require access.

Finally, if you have not already done so you will need to set the execution policy for Powershell.  I’ve found that all you require is RemoteSigned.  To set this, enter set-executionpolicy remotesigned within Powershell.

Powershell Tip #1
In Powershell, type $profile.

PS C:\Program Files\Microsoft\AxFuzzer> $profile
C:\Users\mengli\Documents\WindowsPowerShell\Microsoft.PowerShell_profile.ps1

That points to where your profile is stored at.  This is a powershell script that executes upon the start up of any powershell prompt for the current user.  Go ahead and make the file.  In my case, I made a new file at the location by typing this:

new-item $profile -itemtype file -force

Now, open the file and you can put in things like this:
set-executionpolicy unrestricted
. \\meng\shared\powershell\hyperv.ps1
set-executionpolicy remotesigned

Every new powershell prompt that you

Getting System Information from the command line or Powershell

Although there are any number of tools available to gather and collate information regarding the configuration and composition of a computer, these are often overkill when all you wish to learn is one or more basic details like the processor type, memory, computer name etc.

A quick shortcut is to gather this information from the command line or Powershell.  Windows XP and later includes in the systeminfo utility. Typing this at the command prompt will produce information similar to this:

c:\systeminfo
Host Name: SOMEPC
OS Name: Microsoft Windows 7 Ultimate
OS Version: 6.1.7100 N/A Build 7100
OS Manufacturer: Microsoft Corporation
OS Configuration: Member Workstation
OS Build Type: Multiprocessor Free
Registered Owner: SomeOwner
Registered Organization:
Product ID: 00428-321-7001132-70186
Original Install Date: 04/05/2009, 10:29:33
System Boot Time: 28/09/2009, 13:50:08
System Manufacturer: Dell Inc.
System Model: Latitude D820
System Type: X86-based PC
Processor(s): 1 Processor(s) Installed.
[01]: x86 Family 6 Model 14 Stepping 8 GenuineIntel ~2000 Mhz
BIOS Version: Dell Inc. A09, 04/06/2008
Windows Directory: C:\Windows
System Directory: C:\Windows\system32
Boot Device: \Device\HarddiskVolume2
System Locale: en-gb;English (United Kingdom)
Input Locale: en-gb;English (United Kingdom)
Time Zone: (UTC) Dublin, Edinburgh, Lisbon, London
Total Physical Memory: 3,326 MB
Available Physical Memory: 858 MB
Virtual Memory: Max Size: 8,313 MB
Virtual Memory: Available: 5,500 MB
Virtual Memory: In Use: 2,813 MB
Page File Location(s): C:\pagefile.sys
Domain: somedomain.lan
Logon Server: \\SOMEDC
Hotfix(s): 4 Hotfix(s) Installed.
[01]: KB958830
[02]: KB969497
[03]: KB970789
[04]: KB970858
Network Card(s): 3 NIC(s) Installed.
[01]: Intel(R) PRO/Wireless 3945ABG Network Connection
Connection Name: Wireless Network Connection
DHCP Enabled: Yes
DHCP Server: 10.10.0.1
IP address(es)
[01]: 10.10.0.100
[02]: fe80::901:8ac7:5a6b:1f56
[02]: Broadcom NetXtreme 57xx Gigabit Controller
Connection Name: Local Area Connection
Status: Media disconnected

If you are using Powershell – if not, why not? – the get-wmiobject win32_computersystem command will return rudimentary details regarding the host PC.

PoSH>get-wmiobject win32_computersystem
Domain              : somedomain.lan
Manufacturer        : Dell Inc.
Model               : Latitude D820
Name                : SOMEPC
PrimaryOwnerName    : SomeOwner
TotalPhysicalMemory : 3487690752

Windows Task Scheduler Keyset does not exist Error

Task Scheduler is one of those great little components that once you set it, you tend to forget it. One of the Windows 2003 servers I tend has been running scheduled tasks flawlessly for over a year until they suddenly stopped one day. Every time I went to open/edit and individual task’s properties, a dialog with the following message appeared:

General page initialization failed.
The specific error is:0x80090016: Keyset does not exist
An error has occurred attempting to retrieve task account information. You may continue editing the task object, but will be unable to change task account information.

A solution to this problem is not readily apparent, more so after the ubiquitous net search returns results that relate to Windows 2000, not 2003. After some playing, and with reference to the MS KB article http://support.microsoft.com/default.aspx?scid=kb;en-us;246183, I got the Task Scheduler working again doing the following:

  1. Stop the Cryptographic service
  2. Delete the contents of the C:\Documents and Settings\All Users\Application Data\Microsoft\Crypto\RSA\S-1-5-18 folder – as a precaution, I made a backup first.
  3. Start the Cryptographic service (a server restart may be required)
  4. Re-assign the Run As user account for every required scheduled task