Category Archives: Backup

MySQL Powershell Backup Script

This is easily one of my most commonly used Powershell scripts, and a variation on it runs on my servers at least once a day.  It is essentially a very simple script: it contacts a specified MySQL server and then generates a .SQL backup files for each database found.  It prefixes each backup filename with the day name (monday, tuesday etc.) so if you run it on daily basis, it gives you a seven day backup rotation for your databases.

As always, the use of this script and the accompanying files is done entirely at your own risk. No guarantee either direct or indirect is implied regarding the security, stability, reliability, impact or performance of this script.

The zip file includes copies of mysqldump.exe and mysql.data.dll that you may require.  For details on how to configure and use the script, please see below.

Download the script (ZIP file)

Configuration

There are a few items you will need to configure before you can use the script in anger.  All of the configuration options are presented at the top of the script, so you don’t need to delve into the main chunk of code.

Backup Store Folder

This is where the MySQL backup files will be placed.  Please enter the path here, but do not include any trailing ‘\’

MySQL User Account

You will require a MySQL user account that has SHOW DATABASES, SELECT, LOCK TABLES and RELOAD permissions.  It is also highly advised – especially if performing backups from a remote machine – that this user’s permissions are also limit to readonly.

mysqldump Path

mysqldump is the application that actually creates the backup file.  It is typically installed with MySQL, but if you are running the script remotely or don’t know the file’s location, mysqldump.exe is included in the ZIP file.

MySQL .Net Connector

The script requires the MySQL .Net Connector driver.  This can either be installed, or you can directly load the DLL file.

Using the connector

  1. Download and install the connector from http://dev.mysql.com/downloads/connector/net/
  2. Uncomment Line 38 of the script.  This should say system.reflection.assembly]::LoadWithPartialName(“MySql.Data”)
Loading the library directly (the default method)
If you don’t wish to install the .Net driver, you can directly load the DLL file instead.  The required DLL file is included as part of the ZIP file.
  1. Uncomment line 43 of the script.  This should say Add-Type -Path “C:\Data\Backups\MySQL\MySql.Data.dll”
  2. Amend the path of line 43 to point to the location of the DLL file

Running the script

You can either run the script manually (through Powershell), or automate it through Task Scheduler.  To make life a little easier I tend to create a batch file containing the Powershell command and then invoke the batch file through the task scheduler.

The general format of the command to include in the batch file is

%windir%\System32\WindowsPowerShell\v1.0\powershell.exe “c:\backups\Generic7DayBackup.ps1”

Lastly…

This is by design a very simple script.  If you have any suggestions on how to improve it, please let me know by posting a comment.


Configuring RAID1 on LG N2A2 NAS

I recently purchased an LG N2A2 2 Bay NAS to use as my primary disk to disk backup solution.  As per LG’s recommendation – a big shiny sticker on the box – I upgraded the firmware to the latest version before using the NAS in anger.  This new firmware (6674) has a far improved interface and capabilities than than provided with the firmware shipped with the NAS.  The downside is that all of the online help documentation is in Korean.

As my knowledge of Korean is non-existent, working out how to configure the NAS’ disks to RAID1  required more than a little help from Google Translator.  Detailed below is how I configured RAID1.  As usual, this information is provided “AS IS” and you use it at entirely your own risk.

Caution: ensure you backup all data on the NAS prior to performing this task.  This process will irretrievably wipe all existing data you may have stored on the NAS.

1. Log into the web management interface of the NAS using the admin username and password (by default this is ‘admin’ and ‘admin’).

2. On the homepage of the web interface, click on the Volume option.  If it is not present, go to the Configuration section via the links on the left of the page to find it.

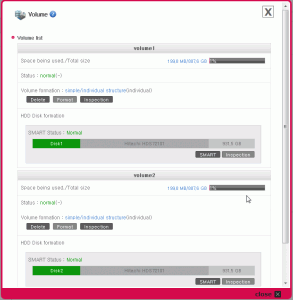
3. If your NAS volumes have never been altered from their as shipped state, the volumes list should contain two separate volume (see screenshot 1).

NAS RAID Screenshot 1

Screenshot 1

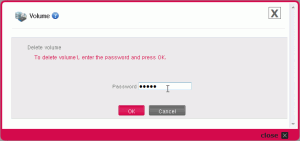
To configure RAID1, both of these volumes must be deleted.  Click on the Delete button next to each volume to do this.  You will be prompted to confirm the deletion (see screenshot 2).  Enter the admin password and click on *OK* to confirm the volume deletion.  Once deleted, a confirmation message will appear (see screenshot 3).

Screenshot 2

Screenshot 2


Screenshot 3

Screenshot 3

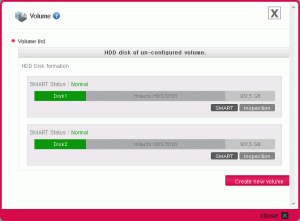
4. Once both volumes have been deleted, the volumes list just show the two unused disks (see screenshot 4).  To start creating the RAID1 volume, click on the Create New Volume button.

Screenshot 4

Screenshot 4

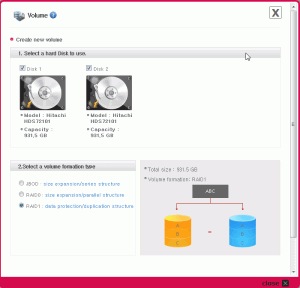
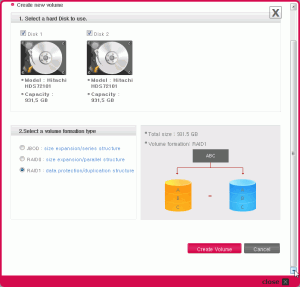
5. The next dialog will list the available unused disks.  Click/select both Disk 1 and Disk 2.  By default, the option RAID1: data protection/duplication structure should automatically be selected under 2. Select a volume formation type, if not, select it (see screenshot 5).

Screenshot 5

Screenshot 5

6. The create new volume dialog is actually larger than its’ containing window.  To proceed, scroll down using the scroll bar on the right and click on the Create Volume button to start the RAID1 creation process (see screenshot 6).

Screenshot 6

Screenshot 6

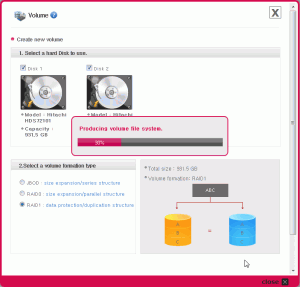
7. The creation process will now begin.  A small dialog will appear showing the progess of the volume creation (see screenshot 7).  Once completed, this dialog will update to display an OK button.  Click on this button to continue.

Screenshot 7

Screenshot 7

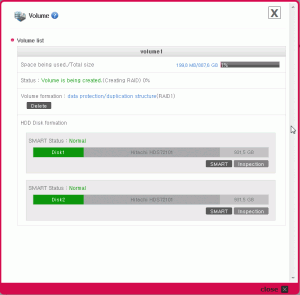
8. You will not be returned to the volume listings which will show a single volume comprising of two disks in RAID1 formation (see screenshot 8).

NAS Screenshot 8

Screenshot 8

Important: The volume is not yet ready for use.

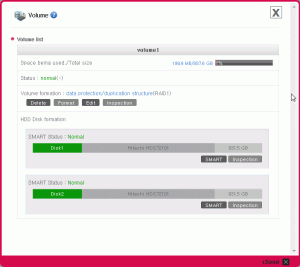
Please note the status message of Volume is being created. (Creating Raid) 0% in screenshot 8.  The new volume is still being configured for RAID.  Only start writing data once this status value changes to normal  (see screenshot 9).  This process may take several hours, and the status message does not dynamically update.  You will need to close the Volume window and then re-open it to get an up-to-date status message.

NAS RAID Screenshot 9

Screenshot 9


Repairing SBS Backups

In virtually all Small Business Server instances I have worked with, the chosen method of backup has invariably been that of the included SBS backup functionality. This isn’t a standalone backup system, but rather a control mechanism that utilises NTBackup to create the actual backups.

Invariably, this backup method does start to misbehave after time. Whilst some problems are easy to resolve (insufficient space on the backup media for example), there are some problems that do not appear to be easily resolved. When this happens, I fall back onto a approach where that rebuild the backup configuration from scratch.

The basic are as follows:

  1. Turn off SBS Backup through Server Management
  2. Go to C:\Program Files\Microsoft Windows Small Business Server\Backup and rename the backup script file Small Business Backup Script.bks
  3. Return to Server Management and re-configure the Backup

That’s it. The key part here is the renaming/removal of the Small Business Backup Script.bks file. This contains the configuration data for the SBS backup, and is not removed when the SBS backup is disabled.